Although the prototype building had a simple corrugated metal roof, I decided to use cedar shakes on the general store. Why? Take your pick:
A. I like the look of cedar shakes.
B. Cedar is a tie-in to the fictional proprietor, Stan Cedarleaf.
C. I used corrugated metal roofing on my last structure and wanted to try something different this time around.
D. I’m crazy and would never do anything the easy way if a harder way is available.
Actually, all of the above have a bit of truth to them. I came up with the first three; my wife added the fourth. In any case, it’s my model and I’ll do what I want. And I’m not crazy … my mother had me tested.
The reality is that we see most model buildings from an aerial perspective as opposed to how we see most real-world buildings from ground level. As a result, the roof of a model is much more noticeable than its prototypical counterpart. Unfortunately, most prototype roofs are basically pretty bland and unappealing. Anything we can do to make these highly visible roofs look more interesting helps make the models be perceived as more realistic by our visitors. This is one of those rare cases when looking more prototypical does not necessarily mean looking more realistic. Again, it all comes down to perception.
Okay … enough modeling philosophy and rationalization. Here is how I did the roof:
I made the sub-roof from the same ¼” cement board material (Hardie-Backer) that I used for the floor and walls. I cut two pieces to size and joined them at the peak with mesh joint tape and thin set mortar. I cut two triangular-shaped gussets from 3” wide by ½” thick poplar and attached these to the underside with Dap 01310 Strong Stick instant grab indoor/outdoor adhesive. The gussets friction-fit against the inside surfaces of the cement board walls at the gable ends of the building.
I put eight 1” long #6 flat head wood screws through the cement board into the gussets for extra holding power. I wanted to make sure the roof assembly was extra strong because it is removable for access to the interior. I painted the exposed edges and overhang portions of the cement board with brown spray paint. I coated the underside of the roof and the wood gussets with clear polyurethane for moisture protection. The following photo shows a view of the underside of the sub-roof.

I coated the top surface of the cement board with a thin layer of thin set mortar to provide a smooth surface for applying the shakes and to cover the countersunk screw heads.
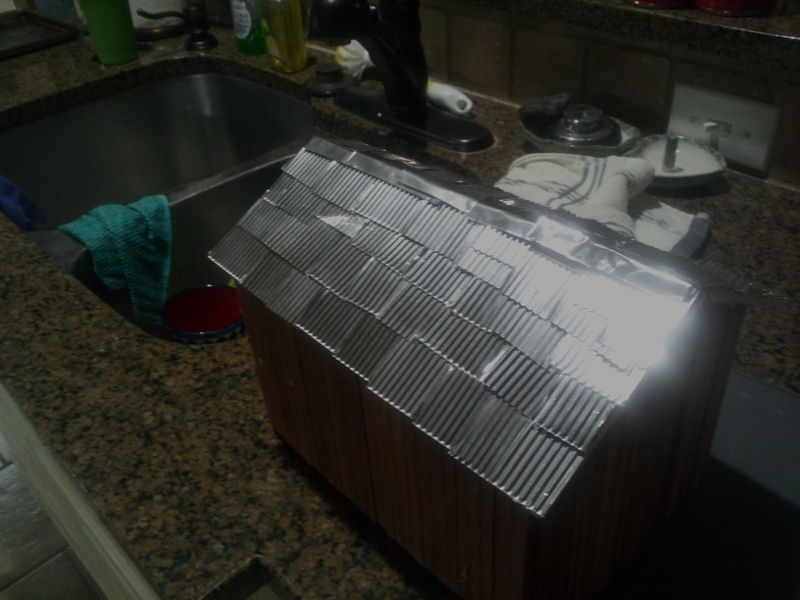
The individual cedar shakes are 1” long x ½” wide (20” x 10” in 1:20.3 scale) from Smith Pond Junction. I split some of them lengthwise to create varying widths for variety. The application was time consuming, but did not involve a high level of concentration. After a starter course of half-length shakes was applied to the lower edges, the courses were applied with a 9” exposure. As each course was completed, I drew a pencil line 9 scale inches above the tops as a guide for the next course. I used Strong Stick adhesive to install the shakes by applying a small dab of adhesive to the top half of each before pressing it into position. I trimmed the final course on each side of the peak to fit. The following photo shows how the roof looked after the shakes were applied.

I wanted the roof to appear to be in fairly good shape – but not new – perhaps halfway through its usable life expectancy. There is some reference material in italics at the end of the post that describes how a wood roof ages over time, just in case you are interested. Here is how I finished the shakes:
I first used a steel wire brush to lightly distress the exposed surfaces of the shakes. I applied a black India ink/alcohol wash (about 8 drops of ink per ounce of 91% isopropyl) to highlight the texture. I went over the roof again with the steel wire brush. I applied a thin green enamel stain to the roof and brushed it with a brass-bristled suede brush while still damp. I followed the green stain with more stain, this time using a thin driftwood enamel stain. Again I brushed it out while still damp with the brass suede brush. After allowing the stain to dry thoroughly, I gave the roof a final coat of the black India ink/ alcohol wash.
The small amount of green and driftwood color that remain on the shakes represent mold, mildew, and oxidizing wood. The colors themselves are not consciously noticeable to the viewer, but do give a subtle impression that the wood is aging naturally. The following photo shows how the shakes looked after staining. They are a muted brown now, but will lighten considerably and appear more silvery after a summer on the layout.

I cut a few ¼” wide strips of thin brass sheet to 2 scale foot lengths. I bent them down the center to the angle of the roof peak. I weathered the brass with a chemical blackener and epoxied them along the peak to form a ridge cap.
The smoke stack is a resin casting from Scale Art Model Services. I spray painted it a rusty brown color. The base plate is a piece of thin brass sheet that I chemically blackened. I drilled a vertical hole through the roof and epoxied the stack in position. I added a weather vane (Ozark Miniatures) with a rooster emblem. Funny thing about roosters – you either love them or you hate them.
I used a fine brush to apply traces of Bragdon powdered pigments to represent soot, bird droppings, rust, dust, and grime. The completed roof received an overspray of clear flat to seal in the weathering.
I made a few pigeons from polymer clay and placed them on the roof for additional visual interest. You don’t need to be an artist to make birds – just pinch small bits of clay into a rough bird-like shape with your fingertips, add a few minor enhancements with a toothpick or needle, and bake until done. Paint the birds with dull-colored craft acrylics and give them a clear flat coating for protection. Put them on a roof and your viewers’ minds will magically transform the rough shapes into birds, because that’s what they expect to see there. I think a few birds provide a nice subtle detail as long as you avoid creating the Alfred Hitchcock effect.

Here is the completed roof after weathering and detailing:

In case you missed any of them, here are the previous posts with information about this ongoing General Store project:
http://largescalecentral.com/forums/topic/22577/discontinued-stone-sheets-at-low
http://largescalecentral.com/forums/topic/22740/using-paper-signs
http://largescalecentral.com/forums/topic/22837/pictures-for-inside-buildings-st
http://largescalecentral.com/forums/topic/22883/general-store-update
http://largescalecentral.com/forums/topic/22891/another-general-store-update
Next, I will add the doors, windows, and trim; then install the interior detailing photos that I described in an earlier post. More to come later …
Bob
Reference Info: How a Prototype Cedar Shake Roof Ages Over Time
When a cedar shake roof is exposed to the effects of sunlight and precipitation, its surface begins to change. This change is partly physical and partly chemical, and it’s cumulatively referred to as weathering.
The first noticeable change is the color. The initial red-brown color tends to fade, and a graying process begins. This change to a silvery gray is the result of ultraviolet radiation from the sun stripping the surface layer (less than 0.01 inch deep) of certain cell-wall materials.
This first change in color is rather rapid, occurring within the first year of exposure (under more severe conditions, within several months). Gradually, the silver gray will change to a darker, more graphite gray, indicating the colonization of the surface by microfungi that complete the initial phase of the weathering process.
By nature, wood rapidly attracts water to its surface. When this happens, the wood swells. As it dries and the moisture content decreases, it shrinks. This repeated wet–dry cycling causes the development of compression and tension stresses; these, in turn, cause microscopic cracks to develop.
Over time, these cracks grow larger and larger, caused by additional wettings or by freezing and thawing. The cracks also trap water and allow wood-rotting organisms to penetrate deeper into the wood. As the water penetrates deeper, the wood becomes harder to dry. With increased moisture, the wood-rotting organisms prolong their destructive activity and damage more wood material than would occur during normal weathering.
As the roof continues to age, the surface and sharp edges from manufacturing are eroded by abrasive particles carried by wind and water and by the action of sunlight. Wood-destroying organisms also continue to slowly degrade the surface and the thicker butt edge. The roof loses its new appearance. Debris from trees accumulates in the valleys and between the shingles.
After each rain, some areas stay wetter longer. Soon, other plants are beginning to grow, primarily lichens and mosses. More debris collects, and the roof appears to be natural and rustic. There are splits developing, and in certain areas cupping and curling begin to become more apparent. Then the leaks begin. Sometimes, this takes 30 years—sometimes, much less.


